*Disclosure: this post contains affiliate links. This means that if you subscribe to Picmonkey’s Royale version, you will be helping to support Carrie This Home at no extra cost to you.
My daughter started pre school last week. As the “blogger mom” I wanted to take a super cute posed back-to-school picture with her holding a homemade “back to school” sign.
Problem was I didn’t have time to make the cute sign.
Let’s just say it’s been a crazy busy month. No time to make cute little signs.
On the first day of school my daughter got dressed, I helped do her hair and took her picture anyway (after bribing for a good smile of course!)
I started with this picture of my cute little girl but no “back to school” sign.

No worries! I can edit one into the picture! I’ll show you how to do it for free (or at a very low cost) by adding a label and text using *PicMonkey!
First Day Of School Picture {Tutorial}
Go to www.PicMonkey.com and click Edit a photo to upload your picture.

Once your picture appears, this legend will also appear on the left hand side of the screen. To add a label, click on the Overlays option (the little butterfly that’s circled) Then use the thin grey bar and scroll down until you see the Labels option. Click on labels.

Choose Your Label & Color
Now you get to choose which label you want!
Keep in mind where you want to put the label and try not to cut off important parts of the picture. In my case I had to choose a long and skinny one so I didn’t cut off my daughter’s head 🙂
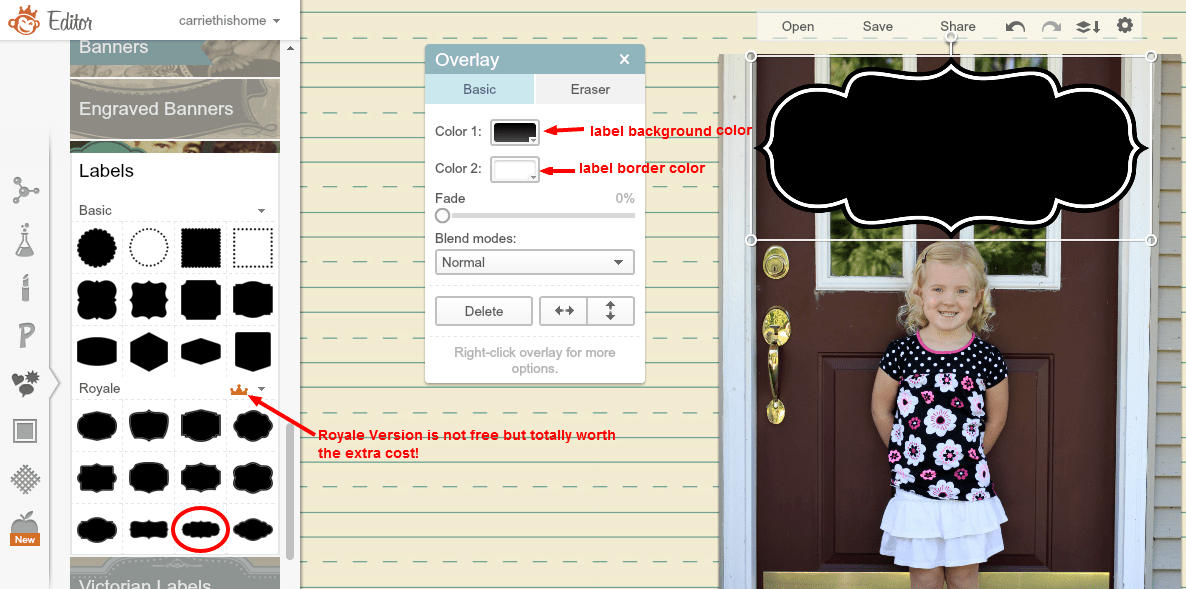
Note: PicMonkey offers a Royale version for a small cost that lets you use really cool options which are all labeled under the little orange crown icon. All the labels on the top are part of the free version and honestly these are the ones I tend to use most of the time. The Royale verson is worth every penny! I use it for my blog and personal use almost on a daily basis!
If you’re using one of the free labels and want to change the label color, click on the label until it’s highlighted (meaning a box with circles around the corners appears over the label. An Overlay legend will appear on your screen. Click on the color you want in the color bar in the overlay legend.

For this project, I decided to go with a Royale label since it was the skinniest label I could find. Plus it’s super cute!
To change the label color on a Royale label, click on the label and then click on the color box next to color 1 or color 2 and choose the desired color from the color legend that appears. Color 1 will display in the background of the label and color 2 will be the border.
I decided to keep the black background with a white border since it has a chalkboard look to it. Very appropriate for a back to school picture!
Move The Label
To move the label around, click on it and then a box with circled corners will appear on it. Then put your cursor in the middle of the label, click and drag it to your desired location.
Change the Label Size
To change the size of the label, click on the label until the box and circled corners appear over it. Grab one of the bottom circles on a corner with your mouse and drag it until you get the desired size.
Add Text To The Picture
Once you’re done making your label and you’re happy with it’s placement, size and colors, merge the two layers together by clicking the icon in the tool bar right above your picture (you can see a red circle around the icon in the picture below) Merging will “glue” the label to the picture so as your adding the text, the label won’t move around. It’s a good idea to do this before you start putting text over the label so that you aren’t trying to move around the text and move the label by accident.
Next, click on the text icon that shows a big T and little t (it’s circled in the picture below). All sorts of fun fonts will appear. Again, the Royale versions will be labeled with the orange crown. There are PLENTY of free fonts available.
Click on your font of choice, then click Add Text and a box saying ‘Type your text here’ will appear over your picture
Type out your words.

To change the font color, highlight the words you want to change, then go to the text legend and move the little circle to the color of your choice. In my case, I thought white letters on a black background would create the “chalkboard” effect, so I chose white.

Next you’ll need to move the text box over the label. Click on the text so the box with circled corners appears over the text. Put your mouse in the middle of the text box until a little cross shows up. Now click and drag the text box where you want it.
If you need to change the text size, you can click and drag one of the bottom corners or highlight the text and change the size number in the text legend. If you want a really big text, you may have to make the text box big enough to fit the text. Play around with it until you get the look you want.

Here’s the finished product:

My little girl deserves a cute little label on her first day of school picture. Thank goodness for technology letting me add it in later!
 T
T
This post linked to Inspire Me Please, Tatertots and Jello, Get Schooled Satruday, It’s Overflowing, Give Me The Goods Monday, Home Stories A to Z, Whimsy Wednesday, Inspiration Monday, Feature Friday Link Palooza, In and Out of the Kitchen, Project Inspired, Do Tell Tuesday, The Makers, Hit Me With Your Best Shot, Project Parade, Creative Spark, Thrifty Thursday, Inspiration Gallery, I’m Lovin’ It, and Serenity Now.


What a great tutorial on how to use picmonkey and your daughter looks so cute for her first day! Thanks for linking up at the creative spark link party we hope that you will link up again today! http://bit.ly/1l2qbE8
Adding a special label to the photo makes that memory that much better! Thanks for the invite, Michelle!
She’s a doll! I love Picmonkey too! I’ve never thought to use it for my own personal pictures though, only for blog photos. Such a great idea!
PicMonkey is a great tool for your personal photos too! I’ve used it to make lots of photo cards, a chalkboard print and wall decor. I don’t know what I’d do without it!
Great solution and it looks great! Your daughter is adorable.
Take care,
KC
Thank you!
That looks great! Such a cutie you have 🙂 I do love PicMonkey and use it for most of my picture editing projects. Hope she had a great first week!
Blessings,
Nicole @ WKH
I don’t know what I’d do without Picmonkey–like you I use it for all my photo editing projects. Thanks for your kind words, Nicole!
I love this tutorial! So fun 🙂 I’m always struggling to make my picture labels in word. Next time I will try out your method! Thanks for visiting from Naomi @ Mrs. Fancee.
I hope this inspires you to create something fun, Naomi! Thanks for stopping by!
Love this idea! Thanks for sharing – I never seem to have time for the signs and such either. I’ll have to give this a try. Suzan