


My next door neighbor just had a precious baby girl. One day I went to her house to meet the newest addition to our neighborhood and soak in some awesome baby snuggles.
Baby snuggles are the best, right?
As I excitedly took a tour of her new nursery, she mentioned how much she liked the baby announcements I made for my kids (which look like this)

Then she asked if I could make her some artwork for her new baby girl’s nursery! I get so excited when I can create things for people I love. Giving a gift that is useful and sweet is so fun!
As I was making the nursery artwork, I wrote up a step-by-step tutorial so you can do it too! It’s a pretty easy project. You probably already have several of the supplies on hand already.
Now you don’t have an excuse not to make it!

DIY Canvas Nursery Artwork Tutorial
In this tutorial, I’ll show you step-by-step how to create a beautiful nursery artwork you can print at home on 8.5×11 cardstock that will then be mounted onto an 8×10 canvas.

DIY Canvas Nursery Artwork Supplies:
This post contains affiliate links for your convenience. See my full disclosure here.
- Your artwork printed on 8.5×11 card stock (I’ll show you how to do that later in this post)
- 1 8×10 canvas
- Mod Podge in matte finish
- small foam roller
- small foam brush
- scissors
Step One: Make Your Artwork
I’m gonna get a little nerdy here but hang with me–this will make sure your artwork turns out the perfect color!
Print out this color chart and choose the colors that closely fit the color of the nursery. These are colors that are converted into HTML color codes. HTML color codes translates colors that we see with our eyes into a code that your computer will understand. So when we look at this color of blue, your computer recognizes it as 0000FF.
We will be creating the artwork using PicMonkey, which is a free online photo editing website. Don’t worry–it’s a very user friendly program! I’ve created tons of printables using PicMonkey.
Go to PicMonkey.com and click on the design button at the top.

Under Basic Edits (the little square icon on the top left), click on Resize. Uncheck keep proportions, and change the numbers to 2550 and 3300. Click apply. Now that white square is exactly the size of your 8.5×11 card stock paper.

Now comes the fun part! Choose your text, overlays and colors and have fun creating! The photo below will help walk you through the main features of PicMonkey you’ll be using.
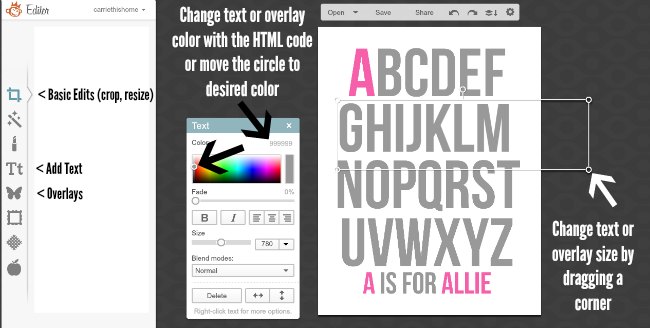
Text: you can add any text you want and change the font, color and size.
Overlays: think of these as stickers for your artwork. There’s tons of fun overlays you can use! You can also change the color and size of the overlays the same way as the text.
Scroll down to the Whimsy collection and you’ll find tons of cute overlays perfect for a baby’s room.

Don’t Get Cut Off
As you’re creating the artwork, keep in mind that the rectangle on your screen is the size of an 8.5×11 sheet of paper. The actual artwork will be smaller than the page so you’ll have to keep the design within the limits of an 8×10.
An 8×10 size is 2400 x 3000. As I’m designing, I regularly use the crop function to show the 2400 x 3000 dimensions to make sure I haven’t gone over the edge.
Here’s how to do it: Click on Basic Edits and then click Crop. Uncheck keep proportions and change the numbers to 2400 x 3000 but DO NOT click Apply.
I repeat: DO NOT CLICK APPLY (if you do by mistake, just click the back arrow at the top part of your screen)
You’ll see a rectangle appear over your artwork. The highlighted portion shows how big an 8×10 is on your 8.5×11 sheet of paper.
As you can see in the picture below, the artwork fits within the 8×10 canvas dimensions. If you notice your artwork going over thes highlighted portion, click cancel and then resize the text and or overlays as needed.

Once you’re happy with your artwork, print it on an 8.5×11 sheet of card stock. Regular paper will not work–the cardstock is thicker and won’t bubble up as much when being mounted on the canvas.
Step Two: Mount Your Artwork on Canvas
Cut the edges of the artwork until it fits the canvas. The artwork should be just a hair smaller than the canvas.
Using a foam brush, spread a very thin layer of Mod Podge all over the front of the canvas. The layer of Mod Podge must be as thin as possible so the paper won’t bubble up but enough so the paper will stick to the canvas.
Then apply your artwork to the canvas and gently press out any air bubbles starting from the center going outwards.
Once the paper is on the canvas, apply another very thin layer of Mod Podge on top of the artwork with the foam brush. Again–the layer of Mod Podge must be as thin as possible to avoid unwanted bubbling of the paper. The Mod Podge on top of the paper will look milky like this:

Next, take a DRY foam roller and gently roll over the wet Mod Podge on top of the artwork to create a matte texture. If bubbles are appearing while using the roller, there’s too much Mod Podge on top of the paper. Gently remove some of the Mod Podge with a clean rag and use the dry roller to make a matte texture that looks like the right side of this picture:
If you notice there are very small or minor bubbling in the paper, no worries. Small bubbles will smooth out once the canvas drys out.
Let the canvas dry completely overnight.
Then enjoy your beautiful nursery artwork!

If you have any questions, leave me a comment and I’ll try to help out. I’d love to see what you come up with!
This post was shared at: Frugal Friday, Think and Make Thursday, Your Turn To Shine, Motivational Monday, Project Inspire{d}, Tutorials and Tips, Do Tell Tuesday, Whimsy Wednesday, The SITS Girls Craft & Recipe Linkup, Sundays Down Under, and Skip The Housework Saturday.